


| Over in our “Tech Center” department we have an article called “Oil’s Well That Ends Well.” It’s an excellent primer on the basics of oil changes, the whys and hows of protecting your car’s most valuable fluid. We’ve pasted that URL below, as a reference. We suggest you read it before scrolling any further down this page. |
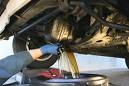
| Welcome back. Now, what we want to do in this month’s “How To…” is walk you through a step-by-step procedure for doing an oil change. A real nuts and bolts approach, if you’ll excuse the bad pun. Before we get into it, though, let’s discuss something. Do you enjoy tinkering around the garage? Do you own your own hand tools? Are you okay with getting a little grease under your fingernails? If not, then this may not be the right procedure for you. Look, we realize not everyone enjoys working on their cars as much as we do. For some of us at Edmunds.com it’s a ritual, like Thanksgiving or the Fourth of July. Worse than that — an addiction. We need our fix. If we don’t feel 40-weight slathering over our hands every week or two, we begin trembling and convulsing. You’ll save roughly a hundred dollars a year doing this procedure on your own. Oh, and maybe another ten bucks or so when you say no to the guy at the quick-lube place trying to sell you a five dollar air filter for $14.95. Chicken feed for most of us in these flush times. If this doesn’t appeal to you, go to Jiffylube or Grease Monkey or your local quick-lube shop, shell out 30 bucks, and be done with it. If, on the other hand, you do this procedure yourself, you’ll have the satisfaction of knowing the job was done right, with the right materials, in its own good time. And that you completed a task (if you work for corporate America this may be the biggest benefit of all — that you actually accomplished something). So if you’ve been contemplating a more active role in your car’s life, or if you want to learn more about your vehicle, this could be a good place to start. Not only will you save a few bucks, you’ll also develop a more intimate relationship with your transportation, never a bad thing in our book. One more thing before we get started. Oil disposal has become a hot issue in the last decade or so. The EPA now levies a huge fine — into six figures — for improper or illegal oil disposal. The days of digging a hole in the back yard and pouring dirty oil into it are long gone. Before doing this procedure, we recommend you find a local quick-lube place that will accept your dirty oil at no charge. One of our editors has an arrangement with a local Jiffylube that accepts not only dirty oil but used filters too. It might be that Jiffylube has a corporate policy of doing this, for community relations, so you might start there. Remember, it is illegal to dispose of used motor oil improperly. Now, if you’re still interested in tackling this task yourself, here’s a list of tools and things you’ll need to perform this procedure: a 3/8-drive socket set (metric will work for both) a combination wrench set (closed- and open-ended, metric) an oil filter wrench something to catch the old oil — an oil pan, a used kitchen basin, a kid’s pail a couple of empty one gallon milk containers with screw-on lids. a funnel and a one quart Ziploc baggie a lot of old newspapers and several dirty rags presoiled work clothes and, if you have long hair, a baseball cap two pair surgical gloves (optional; no, we won’t ask you to cough) a new oil filter (see vehicle’s owner’s manual for requirements) enough oil to refill the engine (check back page of owner’s manual for grade and number of quarts); we recommend name brands, such as Valvoline, Castrol, Pennzoil, Quaker State, Mobil, etc. STEP ONE: Before you do anything, pick out a flat spot on your driveway. Now take your car for a drive around the neighborhood. We do this to heat the oil and make it nice and thin, so it will drain more completely from the engine block. Drive the vehicle far enough and long enough so that the temperature gauge begins to register. If you don’t have a temp gauge, or if you have gauges but they’re broken, turn on the heater and drive until your feet get toasty. The engine is now warm. Park it in your pre-chosen spot. STEP TWO: Turn off the engine, put the car in gear, and set the parking brake firmly. For safety, block the tires with several bricks or large rocks. Go in the house and put on your dirty clothes and cap. Come out and line up your tools. Now slide under the car and locate the oil drain plug. If there isn’t enough room to slide under, you may have to jack up the car to get beneath it. Raise the car with a hydraulic pump and settle it on jackstands. CAUTION: Never get under a car held aloft only by a jack. Always use jackstands. O.K., now locate the drain plug. It should be about the closest thing to the ground, a fairly large nut with a slim washer under it. Sometimes it will even be labeled “drain plug.” (Caution: Make sure you’re not looking at the transmission drain plug. It’s usually a larger nut. If not sure, feel the metal around it. The metal around the engine oil plug should be a lot hotter than around the trans plug. If still not sure, call a friend.) Find your socket set and pull out several sockets that look about the same size as the nut until you find one that fits over it. STEP THREE: If you have them, put on your surgical gloves to keep your hands clean. Grab the socket wrench and put the correct-sized socket on it. Place it over the nut and turn it counter-clockwise. It won’t budge? Try again — really put some force into it this time. If it still won’t dislodge after several tries, locate the same sized closed-end wrench and use that instead. After you get the nut cracked, work it slightly loose with your fingers. Not too loose, though — you don’t want oil all over the place. STEP FOUR: Now take the newspaper and spread it under the car. Make sure to cover where the oil filter sticks out, because it drips after removal. Look up into the engine. See the oil filter? It looks like a miniature, upside-down version of the mountain from “Close Encounters of the Third Kind.” Get the drain pan (or kitchen basin, or kid’s pail) and slide it under the drain plug. Position it so the stream hits it just right (if the plug points to the side and not straight down, the oil will shoot out sideways like from a fire hydrant). Loosen the plug and set it aside. Most of the oil will drain in about two minutes. STEP FIVE: Locate the oil filter wrench. Take the socket off the socket wrench and set it next to the drain plug. Slip the oil filter wrench onto the socket wrench. You’ll probably want to use the short extension, too. The oil filter wrench is like a round dog collar that only chokes in one direction. Set it up to “grab” or “choke” counterclockwise. Slip it over the oil filter and give it a tug. It shouldn’t be that tight. When you feel it give, loosen it a little more, then slide the wrench off and do the rest by hand. Careful — it has hot oil in it! Make sure your face is not under it. Remove it all the way and pour the contents into the drain pan. Set the used oil filter right-side-up on the newspaper. STEP SIX: Slide out, open the hood (if you haven’t already) and remove the oil filler cap. Set it aside. This will help the oil drain a little easier. O.K., take a breather. Now, here’s the deal. If you’re in a hurry, you can dive right in and finish the oil change. But think about it. Drops of dirty oil are still dripping down. Personally, we like to give it a good hour to drain completely. They don’t do that in the quick-lube places. If you have the time, peel off your gloves and take a break. Grab a bite, drink some soda, watch the tube. STEP SEVEN: O.K., you’re back. Put your gloves on and get to work. Before you thread the new oil filter in place, dip a finger into the drain pan and coat the rubber gasket on the bottom of the filter with oil, and set it aside. This will help it seat better against the engine block. With a clean rag, wipe off the round metal circle on the engine where the oil filter fits, then thread the new filter onto the post. When it’s finger-tight, either tighten it by hand if you’re strong enough (it takes about one-half to three-quarters of a turn, no more: read the instructions on the filter), or flip the oil filter wrench over on the socket wrench and tighten it that way. STEP EIGHT: We recommend using a new sealing washer on the drain plug. Put the washer in place and thread the drain plug back into its hole. Scooch it up tight with the socket set, but not so tight that you can’t get it off the next time (remember your struggles earlier; better to have it snug but not stripped.) Now take the oil drain pan and the empty milk bottle and the funnel. If you have a friend, have him hold the bottle while you pour the oil into it. When most of the oil has found the bottom of the bottle, seal it with the lid, then wipe out the inside of the funnel with a clean rag. (We sometimes prop the drain pan against a wall and let it continue to drip into the bottle while we do the next step. You’ll need an extra funnel to do this.) STEP NINE: Set the cleaned funnel into the oil filler hole and pour in as many quarts as the manufacturer recommends. As the oil fills, begin cleaning up. Throw the newspapers in the trash and wipe down all your tools. Discard the empty oil containers in a recycling bin. After the oil is all in, twist the oil cap back on and check the dipstick for oil level, just to make sure. Take the old oil filter, place it in the Ziploc bag, and seal it. STEP TEN: Start the engine and let it idle for about five minutes, looking for leaks. Place the milk container and the Ziploc bag in a box, and set it somewhere in the car where it can’t tip over. Drive to the nearest oil recycling center (as we discussed, most of the national chains, such as Econo Lube N’ Tune, Jiffylube, Grease Monkey, etc., will take your old oil and filters). Take a last look underneath for leaks. That’s it. Remember, changing your oil on a regular basis is the single most important thing you can do to extend the life of your car. Refer to your owner’s manual for exact time periods. |