


| Bet you didn’t know that installing gutters could protect your home from an intruder, did you? Well, they can—when the intruder is water damage, that is! Water damage is a serious foe to your home’s siding and foundation, and installing gutters is one of the main ways you can protect your home against it. Just imagine what damage a torrential rain thwacking down on your house would cause if you had no gutters. Of course this all depends on the shape of your roof, but in general, a home without gutters means a house without proper water drainage. Although there are some problems with gutters (more about this later), installing gutters is the key to keeping the inside of your house nice and dry, and protecting your siding, windows, doors and foundation from water damage. |
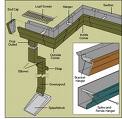
| What Kind of Gutters Do I Buy? Gutters channel water away from the house. And because gutters get used so often, it is important that you find the right gutters to do the job and take care of your home. There are many different types of gutters available such as aluminum, copper, steel and wood. And they come in a variety of different designs and materials. Wood is frequently the least popular type of downspout chosen because of its high price and even higher maintenance. But non-recycled aluminum gutters are the most common type of gutters because of their thickness and consistency. However, probably the best-rated types of gutters for your home are vinyl gutters. Vinyl gutters (the snap-together kind) are easy to install, which is great for a do-it-yourself projects. They are affordable for most homeowners and are practically maintenance free. They normally don’t distort like the metal gutters do. And if they get a dent in it, you can easily pop it out. What Should I Know about Installing Gutters Myself? The most important thing you should know about this gutter installation project is where to install the downspouts on your home. You want to make certain that the water being channeled from your roof has a place to go, and that you have installed enough gutters to make sure this happens efficiently. The best way to do this is to install your gutters on a bit of an angle—not level—so that the water will flow naturally from your roof. If you don’t install the gutters properly, water will not flow downward toward the gutters and this may cause your gutters to backup and overflow. Another important part of a gutter installation project is making certain your gutters are secured properly to your house. Some gutter companies tie their gutter systems into the roof. But if you, the inexperienced handyperson, aren’t careful while securing the gutters, you could possibly cause damage to the roof wires during installation. Or worse yet, you could possibly cause damage to the entire roof. If the roof happens to become damaged during installation, you can expect leakage and water backup. And next, you can expect to have problems with mold and mildew. If you’re wondering how to avoid a roof catastrophe, there are a few things you can do. You can seek the advice of someone who has done DYI gutter installation before and have her or him walk you through it. Or you can ask a subcontractor to do it and forget about doing it yourself. Or you can do some Internet research and find companies that manufacture gutters that don’t touch your home’s roof at all. There are some gutters that are installed directly into the side of the house. Ask around. Step By Step Guide to Installing Gutters Tools and Materials You Need: Extension ladder that reaches at least 3 feet above the edge of your roof to give stability) Ladder stabilizer 2 stakes and wooden pieces (braces for ladder feet) Tape measure Vinyl gutter sections (sold in 10-foot sections, measure total length you need and add 15 percent as waste) Vinyl gutter hangers (1 hanger for every 2 feet) Vinyl inside or outside corners (one for every corner without a downspout or is not a run’s end) Vinyl connectors (2 for each corner and then one every 10 feet) Vinyl end caps (one for every end) Vinyl downspout outlets (1 for every 35 feet) Vinyl downspout elbows (3 for each downspout) Vinyl drainpipe (1 for each downspout, sold in 10-foot sections, measure gutter height and add 5 feet for waste) Vinyl drainpipe hangers (2 for every drain pipe) Chalk line Hacksaw Powered screwdriver 1 ¼-inch deck screws Step One: Creating a Layout Before you buy any gutters, create a layout of your home. Figure out the length of your gutter run, the number of downspouts you will need to purchase and the length of each. The hardware store can help you determine which gutters will work best with your house in terms of material and color. And in determining where to place your gutters, it is best to mimic your previous gutter system (put your new downspouts where the old ones were) if that system worked well for your house. Step Two: Snap A Chalk Layout Line Use a snap chalk line to create a layout of where you will install your gutters. Find the highest point of the gutter run. The high point is 1-inch down from the top of the fascia and the slope is 1/4 inch every 10 feet. If the gutter run is more than 35 feet, the high point is located in the middle of the run and it slopes down to the downspouts on each side. If the gutter run is less than or equal to 35 feet, the high point of the run is located at one end and slopes down to the other end where the downspout is. Mark the highest point of the gutter run on the fascia (the board that the gutters hang from) about 1 1/4 inches below the metal drip-edge flashing. Mark the low end of the gutter run, remembering that the slope should be roughly 1/2 inch for every 10 feet of run. Now have someone hold one end of the chalk line while you hold the other. Then snap a chalk line between the high and low points. Step 3: Attach Downspout Outlet Using a powered screwdriver, install the downspout outlets with one of the 1 1/4-inch deck screws. Make certain the outlets are even and aligned with the chalk line you created so that the downspout can easily attach to the house’s edge. Step 4: Attach Fascia Hangers Find the rafter tails behind the fascia (about 16 inches on the center) and make a mark at your chalk line guide on every other rafter tail that will be about 24 inches apart. Make a pilot hole into the rafter tail at each mark. With 1 1/4-inch deck screws, attach the fascia hangers about 1 inch back from the roof ends to better support the gutters at their ends and in order to leave room for the end cap. Step 5: Put on Gutter Corners Attach the corners that are without downspouts and that are not designated for attachment at the end of the run. Step 6: Attach End of Gutter Run and Cut Gutters Using your hacksaw, cut each gutter section to length so that each section fits between the downspout outlet and the roof’s end. The section should run from approximately the middle of the downspout outlet to the end of the roof. Attach an end cap to the section then secure the section into the downspout outlet. Attach the gutter onto a hanger. Now cut the other gutter sections so that they fit between the downspout outlets. If the gutter continues around a corner, it is best to cut a 45-degree angle on that gutter’s end. If the run requires two sections of gutter, simply overlap them by 8 inches and join them together using 3/8-inch-long, self-tapping, stainless steel screws or pop rivets, in two rows of four each. Step 7: Hang Gutters Arrange the gutter section on the ground and begin snapping the sections together with the connectors. Note: if you have a gutter run that is less than 35 feet then you must secure an end cap to the end that is without an outlet. To hang the gutter you will need two people: you and someone else. One person will hold one end of the gutter while the other person snaps the gutter into its outlet and hooks the gutter onto the hangers. Step 8: Attach Beginning of Drainpipe Secure the downspout outlet to the gutter with four pop rivets or screws. Next, cut a section of the drainpipe so that it fits between the downspout elbow onto the outlet and the downspout outlet elbow on the wall. Snap a downspout elbow to the outlet tube jutting down from the gutter. Hold another elbow against the house and cut a piece of downspout to fit between the two elbows. Use a drainpipe hanger to secure the other elbow to the wall. Step 9: Install Drain Pipe Cut another piece of drainpipe that will fit between the elbow on the wall and 1 ft up from the ground. Connect the drainpipe into the elbow at the top by snapping it into place. Do the same for the bottom. Secure a drainpipe hanger at the lower elbow. Cut a section of pipe to the length of your choice that will channel the water away from the base of your house. *Use a plastic splash block. How Do I Maintain My Gutters? Alas, because they are used so often, gutters get damaged on a regular basis. Some of these daily wear-and-tear damages are easily repaired. Other damages can be pretty extensive, which will require you to install a new gutter system entirely. However, some of the most common problems that arise with gutters are that gutters can become clogged or have blockages due to foliage landing on the roof from trees and wind. These types of problems can be repaired rather easily. Installing gutter shutters or jackets will keep your gutters clean from leaves and other debris but still enable water to drain through. By Christine Elliot |