


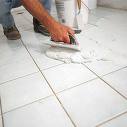
| Grouting is the second to last step in the process of do-it-yourself tiling. It is also the messiest part of the job. Grout is the material that is visible between tiles on a floor, backsplash, in a bathroom, etc. It fills the space between the tiles and supports them-almost like glue. Here are some tips on how to grout your tiling project. |
| Types of Grout: There are three main types of grout-cement based, epoxy-based, and furan resin grouts. Of these, there are two main categories-sanded and non-sanded. Sanded grouts are used for 1/8″ or larger joints, and non-sanded grouts are used for joints smaller than or equal to 1/8″ (you get away with using both kinds for 1/8″ joints). Cement-Based Grout. Cement-based grout can be found in sanded and non-sanded varieties, in powder form or pre-mixed. It is used most often for do-it-yourself projects. It is weaker than epoxy grout, but it is easier to work with (and clean). Furan Resin Grout. This type of grout is available in sanded and unsanded varieties. Instead of containing water, its base is alcohol. Because of this, it has a very high resistance to chemicals. However, it usually only comes in black and requires not only coating the tiles with wax prior to application but also removing the excess grout through steam cleaning. For these reasons, it is not the most practical choice for a do-it-yourself project. Epoxy Grout. Epoxy grout is more expensive than other types of grouts, and is water resistant. These grouts are very effective for tiles that require a high degree of water and stain resistance (such as countertops). Other Types of Grout: Latex-Modified Sanded Cement Grout. This grout is the similar to cement group, but has an added degree of water resistance and bonding characteristics which makes it great for bathrooms, countertops and backsplashes that might be exposed to lots of moisture. Other Types of Grout: Caulking Grout. This grout is squeezed from a tube by hand or from a caulking gun. These grouts match, very closely, the colors of cement brands and are great for filling tough-to-reach joints. Color: Decide What Type Of Look You Want To Create. Light colored grouts highlight the color in the dominant tiles, while darker colored grouts with lighter tiles accentuate the geometric pattern of your design. Darker grouts are good for hiding dirt (kitchen floors) while lighter grouts tend to show grime. Pre-Grouting: Allow Adhesives Time To Cure. Each type of adhesive has a different curing time. Be sure to follow the manufacturer’s instructions for allowing adhesives time to cure prior to grouting. Pre-Grouting: Clean Joints. Remove any excessive adhesive with a razor blade prior to grouting. Pre-Grouting: Moist or Dry? Depending on what type of grout you will be using, you may need to moisten the joints. Read the manufacturer’s label for guidance. Application: Rubber Float: Apply the grout to the tiled surface using a hard rubber grout float at a 45 degree angle. This forces the grout into the joint. Although you should do the entire application at once (to keep consistency of grout color), try to work in a small area, complete it, and move to another. 2-4 square feet is a good space to focus and finish before moving onto the next area. Application: Mold Grout. The grout cures once it is applied, so while it is still workable, tool it into the joints. The grout will take a putty-like consistency that will allow you to work it into the joints that need some extra shaping and or filling. Have a Plan. Make sure you form a plan for large projects such as a floor. Develop a plan to grout the floor so that you do not have to walk across newly grouted joints. Preliminary Cleaning: Using The Edge. As you use the float, skim the excess grout off with the edge of the tool. Do not dig into the joints, but rather, clean the surface. This will aid in the next series of clean-ups. Secondary Cleaning: Sponge-Off: Read the manufacturer’s label to make sure that it is okay to use a moist surface to wipe the tile as the grout is setting. In most cases, it will be. Wait. Let the tile sit for the recommended time. The curing process is very important and you do not want to disturb it. Seal. For most grout types, you will need to seal the joints. Make sure you are using the proper sealing product for the project-always refer to the grout manufacturer’s label. Seal the joints with two applications. Make sure you wipe away any drips off the tile, as some tile will be sensitive to this substance. Final Cleaning: Dry White Cloth. You will now need to remove the “haze” that you see all over your tiled masterpiece. Using a dry, white cloth, rub the lingering haze off the tile. Now that the grout is sealed, you may use water on any tough spots that remain. If there is stubborn residue, use a fiber abrasive pad. Grouting is not a very difficult task as long as you have the proper tools and pay attention to what the manufacturer’s label is telling you for cure times, sealant types, etc. Make sure you properly cover any area that you do not want to get dirty (countertops if you are working on a backsplash) because grouting is MESSY! Clean-up your tools, buckets and work area before the grout sets-it will save you a lot of energy and time. Good luck! By Grace Bloodwell |